Dec 18, 2011
Credit Card Hacking for Free Marketing
This summary is not available. Please
click here to view the post.
Auto copy Software......
Autocopy 1.1 : copy friends data without permission


Hello Friends ! today i want to introduce you with a software named autocopy that automatically copy files from your pc to to your usb drive.
By this software the user who want to copy his friend's file without taking his permission because the software automatically copies your victims data to your usb pen drives automatically.
Software Name: autocopy 1.0
Download

How to use this Software.
1.The use of this software is very easy u do not need to any coding for this.
2.First run the software in administrator mode if you are windows 7 user. Because the software can access your system otherwise the run time access error will occurs.
3.Now Write the path of the directory or file which you want to copy in the Directory path of the software.
4.Then Click on Generate.
5.Now You can see the Folder named hack2star on your desktop.
6.Now just copy copy the read me file and Auto run file in you usb pen drive.
7.Now create a Hack2star Folder in your pen drive. its compulsory because all your friends file or victims file are copies in this folder only.
8.Now run the hide file from the hack2star folder from your desktop.This will hide read me,autorun and hack2star folder.
9.Now insert the pen drive in to your friends desktop.
10.Now insert this to your pc and run the show file from hack2star folder from your desktop.
11.Now You can see the files which you want to steal from your friends pc are in the hack2star folder.

"How does It Work."
when you type the the address of file in to the directory path the software will generate the four files at your desktop.
One read me file that is used to copy your victims file to your pen drive.
Second is hide file that is used to hide the the readme file autorun file and the hack2star folder.
Third is show file that make again visible your hidden data.
And the fourth and last is autorun file that try to to run readme file automatically when you plug in your pen drive to pc.
If the autorun is not working in your victims pc then just make hack2star folder in your usb pen drive and run the hide file. so only the hack2star folder will be invisible but the readme file is will not. now only copy the readme file to your pen drive and insert it in to your friends pc and run the readme file.
It will automatically copy all files to your pen drive. Then insert pen drive to your pc and run show file and you can see the hack2star folder with stolen data of your friend.
Note: The software is personally developed by me and co-operation from Minhal so i dont want to be responsible for any harm to you or your pc.so Just run the application at your own Risk. and i have a suggestion to all my readers that just take risk lollll....or you can never achieve any thing in your life....All the best.....give me a big thank if i'm only little useful for you...
Protect your eyes..............
Protect your eyes by this software.....
It automatically changes the colour as per the present colour in the sky
http://www.mediafire.com/?hmgt7tl4ogewri4
It automatically changes the colour as per the present colour in the sky
http://www.mediafire.com/?hmgt7tl4ogewri4
Nov 16, 2011
How to Download Torrent Files with IDM?
 Downloading files from the Torrents site is easy and completely legal (unless you are downloading copyrighted files).Downloading speed from torrents depends upon various factors like seeders, leechers, internet connection
etc.If have high speed internet connection but still not getting good
downloading speeds then you can use IDM to download them.There are
various methods on the internet to do this but this is the easiest,
simplest and tested method.
Downloading files from the Torrents site is easy and completely legal (unless you are downloading copyrighted files).Downloading speed from torrents depends upon various factors like seeders, leechers, internet connection
etc.If have high speed internet connection but still not getting good
downloading speeds then you can use IDM to download them.There are
various methods on the internet to do this but this is the easiest,
simplest and tested method.How to Download Torrent Files with IDM:
- Open www.torrentz.eu .Search and Download the torrent file (.torrent) of your desired file from there.

- Once you have downloaded that torrent file then go to the website www.torcache.net
- Now upload that torrent file that you have just downloaded and click on the cache button.

- This will generate a new torrent link of your file just copy that link.

- Now go to the www.torrific.com and get register there if you don’t have account otherwise login into your account.
- In the text field paste that new torrent file that you have get in the 4th step and click on get button.

- You will see all the torrent files that are present in that torrent . Click on initiate bittorrent transmission button.

- Now all the files that are present in that torrent file will be available to download just click on any of the file that you want to download and IDM window will popup.

- Now Start Downloading your file.
Oct 7, 2011
Sep 22, 2011
How to know the last shut down Time in your Windows 7 ?
If you are feeling that somebody is physically accessing your computer
& you don’t know at what time he/she is accessing your computer.
Then friends here are the following steps to know the last shut down
time of your computer:-
1. Go to start menu &search event viewer in search option & then hit enter.
If you are a Windows XP user, Go to Start & then Run. Type eventvwr.msc and click OK button.
2. Event viewer window will open.
3. First click on “Window Logs” on the left side of the window & then click “System” on the right side of the window.
4. Now all the system files will open on the right side. Now scroll down the Source column & try to find out the EventLogwith Event ID 6006 will show the correct time and date of last PC shutdown (In this case the time is 4/21/2010 12:26:57 PM).
So the last shut down time of my PC is 4/21/2010 12:26:57 PM.
That’s how you can easily find out when exactly was your computer last shut down.
How to use Kaspersky for Lifetime without Patch ?
Generally Kaspersky provide us 30 days trial period on its Anti-virus
Product. So there are the few steps that you have to perform when your
trial license going to expire after 30 days for getting a new trial
license :
1. Delete old key and turn off self defense (Settings-Options in kaspersky and turn off Enable self-defense, and click OK).
2. Open Registry editor (click start in windows menu then goto run and write regedit and click Ok) and go through these :
For 32bit OS: HKEY_LOCAL_MACHINE \ SOFTWARE \ KasperskyLab \ protected \ AVP9 \ environment
For 64bit OS: HKEY_LOCAL_MACHINE \ SOFTWARE \ Wow6432Node \ KasperskyLab \ protected \ AVP9 \ environment
3. Right look for PCID and right click and modify three or four last numbers or letters example : (8F10C22F-6EF6-4378-BAB1-34722F6D454)
and enter any other three-letter four-number and close the Registry Editor.
Contact4. Right click on Kaspersky icon in the task bar and choose exit.
5. Go to Start-Programs menu, open the Kaspersky and when you activate searching trial license and you have new license of a peaceful month.
6. Go to Kaspersky settings and turn on self-defense.
This is hardly a 2 minute job and you got again a trial period of 30 days, and there is no rush for more keys.
Note : Most of the patches that you will found on the net are basically work on that trick, they simply make the changes in the registry and change identification of your computer to the Kaspersky server, thus Kaspersky log server recognizes you as a new user and assigns you new trial license.
All the programs or applications are being opened by notepad.exe
After reading a lot on the net I finally did myself.,...
This is what I did..
1. Some how restrat the windows and while staring keep on pressing F2 & F8 (probably F8) is more appropriate.. to bring up the selection to start windows in Safe mode with Command prompt
2. Select Safe Mode with Command Promt.
3. Loging and the Command Prompt will be opened.
4. Type regedit.exe
5. Browse through...
Computer\HKEY_CURRENT_USER\Software\Microsoft\Windows\CurrentVersion\Explorer\FileExts\.exe\ node
6. If you find anything other than OpenWithList & OpenWithProgIDs (in my case UserProgAssoc) , needs to be deleted. The Thrird key might have notepad.exe defined in that..
7. You might find that the custom key cannot be deleted.. So Right-Click->Permission.
8. Then Click Advanced and openn and add FULL control to the current logged in user. To be safe set all with Full Control. And APPLY. (Make sure all inherited are selected or checked)
9. Now you should be able to delete the third or forth key which is causing this massive problem..
10. Once deleted then SHUTDOWN and restart normally...
Thats all ....enjoy
How to Make .Cue File In Notepad ?
open up notepad n type (or copy n paste) this:
FILE "NAME.BIN" BINARY
TRACK 01 MODE1/2352
INDEX 01 00:00:00
change the word NAME.BIN inside the quotation marks to whatever the name of your BIN file is.......
when you go to 'save as'
in the 'files of type' ..click on the arrow and change from text document (*.txt) to 'all files'
n name it the same as the bin file
for instance..if the bin file is anything.bin
save your cue file as anything.cue
after that save it, copy and paste the file too the folder with your bin file
Sep 17, 2011
Hide Computer Hard disk drive (C,D,E ,F-) Without Third Party Tools
We can hide any hard disk drives in Windows XP, Windows Vista and
Windows 7 without using any third party software. We can do it from Disk
Management page. Here you can select the drive letter and delete it. It
will result the particular drive inaccessible in My Computer. So to
hide any disk drive follow the steps below.
How to Hide Hard Disk Drive in Windows OS
1. Right Click on My Computer

2. Click on Manage
Now computer management Window will be opened.
3. Click on Disk Management

Now you should select the drive letter which you need to hide from the My Computer list. You should delete the drive from Disk Management to disable it and completely inaccessible for Windows. If you want to enable it again, you may create the drive letter once gain in Disk Management. So you can easily hide any hard drive drive in your Windows computer without the help of a third party tool.
How to Hide Hard Disk Drive in Windows OS
1. Right Click on My Computer
2. Click on Manage
Now computer management Window will be opened.
3. Click on Disk Management
Now you should select the drive letter which you need to hide from the My Computer list. You should delete the drive from Disk Management to disable it and completely inaccessible for Windows. If you want to enable it again, you may create the drive letter once gain in Disk Management. So you can easily hide any hard drive drive in your Windows computer without the help of a third party tool.
How to prevent overheating pc?
Protect your Computer from overheating -keep PC cool
Reasons for Computer Overheating issues
The major reasons for processor overheats are :
1. CPU fan failed to work
2. Heat sink issue
3. Dust inside the cabinet
4. Flow of hot air from cabinet blocked
5. PC Overclocking
If there is any heat related issues happen in your computer, at first place we should check your cabinet fan and processor fan. If the fans in your computer cabinet is not working properly, it can increase the temperature inside the CPU.
Another reason is heat sink may be not doing its job properly. Heat sink is the device which is designed to remove over heat from processor to surrounding air and keep the processor cool. The dust inside the cabinet can indirectly increase the temperature inside your computer cabinet. It can reduce the speed and functionality of your computer fan.
Another major reason for CPU overheating is the denial of free flow of hot air from your computer cabinet. This can increase the temperature inside your computer cabinet. PC overclocking too can increase the temperature produced by your CPU.
Solutions to avoid PC overheating issues
The first step we should do is to check whether the fans in your cabinet are working properly or not. If there is any issue with fans, change the fan immediately. Changing heat sink and revert back overclocking are other options to reduce computer overheating. Always make sure that hot air flow from your computer is not blocked by surrounding materials. If there is any dust inside your cabinet, clean that.
How to start WLAN AutoConfig (Wlansvc Service) in Windows 7 ?
WLAN AutoConfig is the display name of Wlansvc Service ,which is
responsible for enabling your computer with supporting wireless adapter
to be connected by other Windows network devices wirelessly. Sometimes
this service will not be started in our Windows 7 computer by some
reasons. So we may need to go to the service page and start this service
manually.
To start WLAN AutoConfig, follow the steps below.
1. Click on Start
2. On Search type services
3. Click on services
Now the services window will be opened. In the services window select the WLAN AutoConfig

Open this service and click on Start button. After starting the service click on Apply and OK.
Start WLAN AutoConfig
To start WLAN AutoConfig, follow the steps below.
1. Click on Start
2. On Search type services
3. Click on services
Now the services window will be opened. In the services window select the WLAN AutoConfig
Open this service and click on Start button. After starting the service click on Apply and OK.
Recover forgoten router password
Forgot my Router Password and cannot login: Recover Router Password
Recover Lost Router Password
Unfortunately for Routers belongs to standard Small Office Home Office devices category, there is no lost password recover procedure like high end routers. So practically we cannot recover the lost password and save the current router settings. Though we have a set of standard steps to troubleshoot this issue.
1. Check for the previous router password
In this step we should try to pick the previous router password from either memory or from any written documents. For an average user, there is a chance that he may write down the router password in his diary or other some papers.
2. Try default user name and password to login router
Some times the user may never change his default router user name and password. So it is worth to try the default user name and password to login his router. Default user name and password is the different combination of admin.
Try the following combination
1. Try both user name and password as admin
2. User name is admin and left password field blank
3. User Name is blank and password is admin
3. Reset Router Settings
If the above two options won't work, the last one is reset and reconfigure your router. To know the steps to reset your router click on the link below.
How to reset a router
After resetting the router you should reconfigure the router to get your Internet connection back. To do this check the link below.
Configuration Steps of SOHO Routers
1. Configure D link Wireless Router
2. How to configure BSNL Teracom Modem
3. Setup Belkin Wireless Router
4. Setup Linksys Wireless Router in PPPoE
5. Configure Linksys Wireless Range Expander
If you have a router from different manufacturer, follow the user manual to configure the router better.
How to Reset a Router or Modem - Hard Reset and Soft Reset ?
In many instances we may need to reset the router or modem as the part
of troubleshooting steps. Before starting explain how to reset your
router, you should understand what is reset. By resetting your Router /
Modem, your device will go back to the factory default settings and
again you may need to configure it. So before resetting your router, you
should better know how to re-configure your router.
Why should I reset my router ?
There are some situations like your router or modem stops responding or configured the device incorrectly, you may need to reset your device. Some times after upgrading to the latest router /modem firmware you may need to reset your router as instructed by the manufacturer.
Different methods to reset your router
There are three different types of router resetting.
1. Soft Reset
2. Reset
3. Hard Reset
Now let us examine each resetting methods.
1. Soft Reset
Soft reset is done by selecting the reset options through the router administration page(web interface). Depends on various firmwares and manufactures, this options comes in various forms like reset to factory default , reboot with factory settings etc. You should select the particular option and click on OK. Now the router start rebooting and after one minute it will be back with default factory settings. This kind of reset is known as soft reset.
2. Reset by holding reset button
If soft reset is not working for you, next option is holding the reset button of your router for 30 seconds and release your hands after it. You can find reset button usually near power button a small hole which can be pressed by pen tip or pin. So the procedure is:
1. Hold reset button using pen tip or pin for 30 seconds
2. Make sure power light is blinking while pressing reset button
3. Release your hands after 30 seconds and wait for one min
Now your router will be reset to factory default settings.
3. Hard Reset your Router
If the normal reset didn't work on your router, you can perform hard reset. It is the most powerful reset form for any kind of Small Office Home Office devices(SOHO) like routers and modems. Steps top perform hard reset on your router are:
1. Hold reset button for 30 seconds (make sure power light is blinking)
2. Unplug the power cable (never release your hands from holding reset button) for 30 seconds
3. Connect power cable and still hold reset button for 30 seconds
4. Release your hands now (you are continuously holding reset button for 90 seconds)
Now wait one minute and make sure power button is steady.
Configuration Steps of SOHO Routers
1. Configure D link Wireless Router
2. How to configure BSNL Teracom Modem
3. Setup Belkin Wireless Router
4. Setup Linksys Wireless Router in PPPoE
5. Configure Linksys Wireless Range Expander
If you have a router from different manufacturer, follow the user manual to configure the router better.
How to configure Linksys Range Expander (WRE54G)?
As our need increases people try to find a way to increase the range of
the current wireless network. That end with the invention of Wireless
Range Expander. To increase the range and accessibility of a wireless
network from an access point or wireless router we need to add Wireless
Range Expander or simply calling Wireless Repeater in our network.
Working of Wireless Repeater/Expander is like this device will receive signals from Wireless Access Point (Wireless Router) and repeat the same signal. So the available signal range doubles. In this tutorial I am going to write steps to configure or install one of the famous Range Expander - Linksys WRE54G on your network.
 Range Expander
The steps to configure wireless Range Expander on your computer network are:
1. Connect Range Expander to your computer using Ethernet cable.
2. On the Address bar of your browser type 192.168.1.240
The default IP address of Linksys Wireless Range expander is 192.168.1.240. After this press enter.
3. Log on to the setup page of WRE54G
The default user name:
Default Password : admin
There is no default user name for WRE54G and log on to the Range Expander setup page.
4. Enter the Wireless details present in the Wireless Access Point

We should enter the same details configured in the source wireless Access Point.

If the Wireless network is security enabled we need to set the same settings on our Range Expander. After entering the details click on save settings button.
Working of Wireless Repeater/Expander is like this device will receive signals from Wireless Access Point (Wireless Router) and repeat the same signal. So the available signal range doubles. In this tutorial I am going to write steps to configure or install one of the famous Range Expander - Linksys WRE54G on your network.
Range ExpanderSteps to configure WRE54G to boost your wireless signals
The steps to configure wireless Range Expander on your computer network are:
1. Connect Range Expander to your computer using Ethernet cable.
2. On the Address bar of your browser type 192.168.1.240
The default IP address of Linksys Wireless Range expander is 192.168.1.240. After this press enter.
3. Log on to the setup page of WRE54G
The default user name:
Default Password : admin
There is no default user name for WRE54G and log on to the Range Expander setup page.
4. Enter the Wireless details present in the Wireless Access Point
We should enter the same details configured in the source wireless Access Point.
If the Wireless network is security enabled we need to set the same settings on our Range Expander. After entering the details click on save settings button.
How to Setup Linksys Wireless Router?
Many times its heard that configuring Linksys WRT54G Wireless G Router in PPPOE mode
is difficult. So I have made a simple tutorial to configure WRT54G
Wireless Router in PPPOE mode with simple steps and images. To learn how
to configure other Linksys Router models click on the link below:


After this you should click on Save Settings button
6. How to Setup Links Linksys Router for Cable Internet connection
To know more about how to configure Linksys wireless router for cable Internet connection click on the link below.
Configure Linksys Router in PPPOE mode
Step 1: Make sure that you can go online by connecting your computer to the modem (Without connecting WRT54G router in the network).
Step 2: Connect your computer to the one of the LAN port of WRT54G.
Step 3: Connect the modem to the WAN Port of WRT54G and all devices should be powered on.
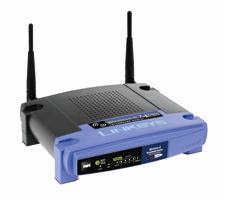 Linksys Wireless G Router
Step 4: Open Internet Explorer and type the default IP Address of the Router. The default IP address of WRT54G is 192.168.1.1 and press enter.
Step 5: After Entering the default user name and Password you will log on to the Router Setup page.
Default user name : {mo user name}
Default Password : admin
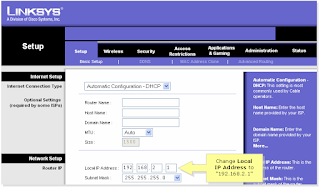
Update: To configure in PPPOE there is no need to change the current Local IP Address.
Step 6: On setup page select PPPOE instead of "Automatic Configuration DHCP"
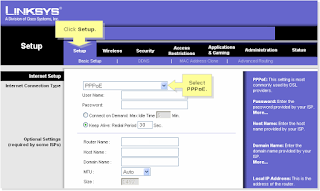
Step 7: Enter the user name and Password provided by your Internet Service Provider and click on save.
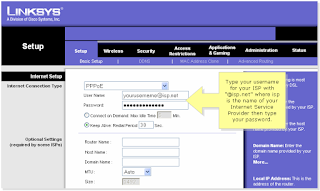
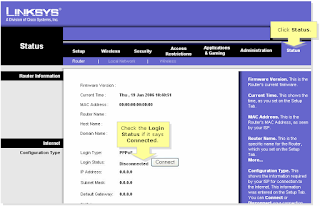
Step 8: Click on status bar and click on connect button.
How to Setup Linksys Wireless Router
I started my computer networking
career by supporting SOHO products mainly Linksys wireless products. I
was assigned to a networking division which handle mainly Linksys
wireless router where I assisted clients to implement linksys wireless
router in their already existing networks or start a new small networks
with Linksys wireless router. In this blog I wrote many articles to
setup various models of Linksys wireless router and I think it will be
useful if I join all the linksys router setup guides in a single post.
Later in my career Cisco bought Linksys and it become Linksys Cisco.
With the guidance of Cisco, Linksys introduced many high quality
wireless router in market. Most of the Linksys wireless router's have
similar kind of configuration steps but in some Linksys models it is
different. Here I am planing to give a common setup guide for all kind
of Linksys router models and give links to specific Linksys setup
guides. So it will be easy for you to follow the common setup steps and
then select the model number of your Linksys Wireless router and follow
the respective link to configure specific linksys wireless router.
Common Steps to setup all kind of Linksys Wireless Router
The steps I am providing here are common for all kind of Linksys Router. So you do not worry about the model you own.
1. Make sure you can go online before adding Linksys Router in your network
This is the very basic step in Linksys Router setup process. You should always make sure that you can access Internet before configuring and connecting Linksys Router to your Network. To do this make sure the computer connected to your modem and you can access Internet.
2. Check the Modem IP address and type of Internet Connection
Next important step in Linksys wireless router setup procedure is to check the modem IP address. We should check whether you are using DSL connection or Cable Internet connection. Configuration steps of Linksys router for DSL and Cable Internet are different. If you are not so techie to know how to find the Internet connection type, I recommend you to contact your ISP customer support and verify your Internet connection type. Now you should check the IP address of the modem. To do this please follow steps in one of my previous article.
How to Find Login IP address of a Modem
You should note the Modem IP address because we need this information while configuring Linksys router.
3. Connect your computer to Linksys Wireless Router
Disconnect modem from computer and follow the steps below.
i. Connect computer LAN port to Linksys Router LAN port
You can use an Ethernet cable (comes with Linksys router) to connect your computer to any one of the LAN ports on Linksys wireless router.
ii. Turn on your Linksys Wireless Router
Setup Linksys Wireless Router without setup CD
The steps I am presenting here do not need the setup disc comes with Linksys Router.
4. Login to Linksys Wireless Router
To login to Linksys Router, follow the steps below.
i. Type 192.168.1.1 on address bar of browser
ii. Enter user name and password
Usually there is no user name for Linksys router and password is admin.
So it would be like:
UserName:
Password : admin
Then press enter to login Linksys Wireless Router.
5. Change the Linksys Router IP address according to modem IP address
If the modem IP address is 192.168.1.1, we should change Linksys router IP address to 192.168.2.1. If the modem IP address is something else, you should not change the IP address of Links Router.
After this you should click on Save Settings button
6. How to Setup Links Linksys Router for Cable Internet connection
To know more about how to configure Linksys wireless router for cable Internet connection click on the link below.
Configure Linksys Router in PPPOE mode
Configure WRT54G Wireless Router in PPPOE mode
Step 1: Make sure that you can go online by connecting your computer to the modem (Without connecting WRT54G router in the network).
Step 2: Connect your computer to the one of the LAN port of WRT54G.
Step 3: Connect the modem to the WAN Port of WRT54G and all devices should be powered on.
 Linksys Wireless G Router
 Step 4: Open Internet Explorer and type the default IP Address of the Router. The default IP address of WRT54G is 192.168.1.1 and press enter.

Step 5: After Entering the default user name and Password you will log on to the Router Setup page.
Default user name : {mo user name}
Default Password : admin

Update: To configure in PPPOE there is no need to change the current Local IP Address.
Step 6: On setup page select PPPOE instead of "Automatic Configuration DHCP"

Step 7: Enter the user name and Password provided by your Internet Service Provider and click on save.

Step 8: Click on status bar and click on connect button.

Setup Belkin Wireless N router by accessing the setup page
In this tutorial I am explaining the steps to configure Belkin Wireless N
router F5D8233-4 by accessing the web based setup page. Usually geeks
are configuring there Wireless routers by accessing their router setup
page ,not by running the setup CD from Belkin. If you want to configure
without dirty your hand by running the setup CD ,click on the link
provided below.
How to Configure Belkin wireless router by running setup CD
On this page you will get instructions to run the CD and configure the wireless router. To set advance settings on your router it is better configure router by accessing the web based setup page and set the settings manually.
Before accessing the web based setup page connect your router to the computer as shown in the figure. Here Ethernet port of the computer is connected to the LAN port of Belkin router using an Ethernet cable.

Now unplug the power cable from the modem. Let the Belking router and the computer powered on. Steps to setup Belking Router by accessing the steup page are:
1. Access Belkin setup page
To access Belkin's web based setup page type 192.168.2.1 on the address bar of the browser.
The default IP address of Belkin Wireless N router F5D8233-4 is 192.168.2.1

2. Enter the password while it prompts
By default there is no password set for the router and you just simply click submit button to log on to router setup page.

3. Setup the connection type ( Internet WAN)
Click on Internet WAN and select the connection type you want.

If you select the Dynamic IP option the window will be like this.

If you select PPPoE configuration from Belkin connection type the page will look like:

Here you should enter the user name and password provided by your Internet Service Provider. After entering the details you should click on save settings. Now your Belkin router is configured in PPPoE. In the same way your can setup your Belkin router for static IP and PPTP.
4. Change the LAN settings in Belkin Router
You can change the router IP address and you can enable or disable the DHCP function on the Belkin router using this window. By default belkin router IP address is 192.168.2.1 but you can change it to any other valid IP address.

5. Setup Wireless feature in Belkin Router
To edit the wireless settings click on Wireless tab in the setup page. You can edit the Wireless network name and wireless channel here.

Wireless name (SSID) is the name of your wireless network. The most recommended wireless channel is 6. You can use wireless channel 1 and 11 too.
6. Enable Wireless Security in Belkin
To enable wireless security on Belkin router click on security under wireless tab and follow the instructions in the link below.
enable wireless security in Belkin wireless router

You should update Belkin Router Firmware
It is very important that you should update Belkin router firmware after configuring the router. To know how to update the firmware read below.
For getting the optimum performance from a device we need to update the
firmware of that device. Belkin releases the new updated firmware for
their products to improve the features and fix the known bugs in the
earlier one. So it is our duty to update our wireless router with latest
firmware release.
How to check if I am having latest firmware in Belkin Router
To check it follow the steps below.
1. Log on to Belkin router
To know how to log on to belkin wireless router click on the link below.
Access Belkin setup page
2. Click on Utilities and under Utilities you can see Firmware Update.

3. Click on Check Firmware version.
If you have an old version of firmware it will show you that and will give an option to download the latest version of firmware.
Download Latest version of Firmware
To download the latest version of firmware follow the instruction given by the router after click on the button check the firmware version.

1. Click on Download Firmware Now
2. Save the Firmware on your Desktop
Update Belkin Router's Firmware
To update routers firmware go to the update Firmware page again.
1. Click on Update
2. You will be asked if you are sure you want to continue.

Click “OK” to continue.
3. One more alert will come as in the image below.
Allow firmware updation on Belkin Router
Click OK to continue.
4. Now the router starts reboot. After rebooting the Belkin wireless router the firmware version will be updated to the latest version. You can verifie it by following the first steps provided in this post.
How to Configure Belkin wireless router by running setup CD
On this page you will get instructions to run the CD and configure the wireless router. To set advance settings on your router it is better configure router by accessing the web based setup page and set the settings manually.
Steps to configure Belkin Wireless N router
Before accessing the web based setup page connect your router to the computer as shown in the figure. Here Ethernet port of the computer is connected to the LAN port of Belkin router using an Ethernet cable.
Now unplug the power cable from the modem. Let the Belking router and the computer powered on. Steps to setup Belking Router by accessing the steup page are:
1. Access Belkin setup page
To access Belkin's web based setup page type 192.168.2.1 on the address bar of the browser.
The default IP address of Belkin Wireless N router F5D8233-4 is 192.168.2.1
2. Enter the password while it prompts
By default there is no password set for the router and you just simply click submit button to log on to router setup page.
3. Setup the connection type ( Internet WAN)
Click on Internet WAN and select the connection type you want.
If you select the Dynamic IP option the window will be like this.
If you select PPPoE configuration from Belkin connection type the page will look like:
Here you should enter the user name and password provided by your Internet Service Provider. After entering the details you should click on save settings. Now your Belkin router is configured in PPPoE. In the same way your can setup your Belkin router for static IP and PPTP.
4. Change the LAN settings in Belkin Router
You can change the router IP address and you can enable or disable the DHCP function on the Belkin router using this window. By default belkin router IP address is 192.168.2.1 but you can change it to any other valid IP address.
5. Setup Wireless feature in Belkin Router
To edit the wireless settings click on Wireless tab in the setup page. You can edit the Wireless network name and wireless channel here.
Wireless name (SSID) is the name of your wireless network. The most recommended wireless channel is 6. You can use wireless channel 1 and 11 too.
6. Enable Wireless Security in Belkin
To enable wireless security on Belkin router click on security under wireless tab and follow the instructions in the link below.
enable wireless security in Belkin wireless router
You should update Belkin Router Firmware
It is very important that you should update Belkin router firmware after configuring the router. To know how to update the firmware read below.
Update Firmware of Belkin Wireless N Router
How to check if I am having latest firmware in Belkin Router
To check it follow the steps below.
1. Log on to Belkin router
To know how to log on to belkin wireless router click on the link below.
Access Belkin setup page
2. Click on Utilities and under Utilities you can see Firmware Update.
3. Click on Check Firmware version.
If you have an old version of firmware it will show you that and will give an option to download the latest version of firmware.
Download Latest version of Firmware
To download the latest version of firmware follow the instruction given by the router after click on the button check the firmware version.
1. Click on Download Firmware Now
2. Save the Firmware on your Desktop
Update Belkin Router's Firmware
To update routers firmware go to the update Firmware page again.
1. Click on Update
2. You will be asked if you are sure you want to continue.
Click “OK” to continue.
3. One more alert will come as in the image below.
Allow firmware updation on Belkin Router
Click OK to continue.
4. Now the router starts reboot. After rebooting the Belkin wireless router the firmware version will be updated to the latest version. You can verifie it by following the first steps provided in this post.
Setup Wireless and Security in Teracom BSNL Modem / Router
Majority of BSNL wireless broadband modems belongs to Teracom and here I
am writing a small tutorial to setup wireless and wireless security in
BSNL Teracom modem. This Wireless router has routing feature and can
connect more than one computer to the network if DHCP server is enabled
in the modem. Here I am writing wireless configuration steps and hope
you found it helpful.
Steps to configure BSNL Teracom Wireless settings are:
1. Login to BSNL Teracom Wireless Modem
The default modem IP address is 192.168.1.1 and type this number on the address bar of your browser and press enter. Now you will be prompted to enter Teracom modem user name and password.

Default BSNL modem user name and password is :
User Name: admin
Password : admin
Now click OK to login Teracom modem. Now you will be in BSNL overview page.

If you are looking for help to configure Internet on your BSNL Modem, click on the link below.
Configure Internet connection in BSNL Teracom Modem
2. Go to BSNL Wireless Settings Page
Click on Wireless Network which located under Configuration tab.

First of all you should turn on wireless by checking enable button opposite to Wireless Network. Here you can change the Wireless network name(SSID) of your wireless network by typing any name which you like in wireless Network.
3. Enable Wireless Security in BSNL Teracom Modem
To enable wireless security in BSNL modem follow the steps below.
i. Select proper wireless encryption from the drop down menu opposite to security options.

If you are a home user and just need a security and not worried much about it, the easier one is WEP 64 Bit Encryption. If you select this as the security option , you can type any hexa decimal number ( 0-9 and A-F) as the wireless key. Don't forget to click on confirm button. Now onwards you need to enter this ten digit key to log in to your wireless network.
Configure BSNL Teracom Modem Wireless security
Steps to configure BSNL Teracom Wireless settings are:
1. Login to BSNL Teracom Wireless Modem
The default modem IP address is 192.168.1.1 and type this number on the address bar of your browser and press enter. Now you will be prompted to enter Teracom modem user name and password.
Default BSNL modem user name and password is :
User Name: admin
Password : admin
Now click OK to login Teracom modem. Now you will be in BSNL overview page.
If you are looking for help to configure Internet on your BSNL Modem, click on the link below.
Configure Internet connection in BSNL Teracom Modem
2. Go to BSNL Wireless Settings Page
Click on Wireless Network which located under Configuration tab.
First of all you should turn on wireless by checking enable button opposite to Wireless Network. Here you can change the Wireless network name(SSID) of your wireless network by typing any name which you like in wireless Network.
3. Enable Wireless Security in BSNL Teracom Modem
To enable wireless security in BSNL modem follow the steps below.
i. Select proper wireless encryption from the drop down menu opposite to security options.
If you are a home user and just need a security and not worried much about it, the easier one is WEP 64 Bit Encryption. If you select this as the security option , you can type any hexa decimal number ( 0-9 and A-F) as the wireless key. Don't forget to click on confirm button. Now onwards you need to enter this ten digit key to log in to your wireless network.
Configure Internet Connection in BSNL Teracom Modem
To configure Internet in BSNL Teracom modem we don't need to follow the
steps in the setup CD. We can directly login to the Teracom modem and
configure the Internet by typing the user name and Password from BSNL.
Here I am presenting the steps to configure BSNL Teracom modem in PPPoE
configuration.
To configure Internet connection in Teracom modem follow the steps below.
1. Login to BSNL Teracom Wireless Modem
Type 192.168.1.1 on the address bar of your browser to login Teracom modem.
Default BSNL modem user name and password is :
User Name: admin
Password : admin
Click OK. Now you will be on BSNL modem configuration page.
2. Click on Configuration Tab
Now click on Internet Connection to configure Internet in BSNL Teracom modem.

3. Remove old connections configured in BSNL mode
If you see any connections already made in the modem ,select the connection and remove them.

4. Add new connection in BSNL modem
Now click on the add button on the bottom of the page to create a new connection.

Now add following parameters in Internet Connection Configuration.
PVC Name: PVC0
VCI : 35
Service Category : UBR with PCR
Keep all other information the default and click Next.
5. Configure Connection Type
Now select PPP Over Ethernet (PPPoE) and LLC/ SNAP.

Now click Next.
6. Configure WAN IP Settings in BSNL Modem
Select Obtain IP Automatically. Make sure NAT and Default Route is checked.

Click on Next.
7. Set User Name and Password in BSNL Modem

Now type the user name and password provided by BSNL and click Next.
Now you will come to the summary page.

Click on Apply.
8. Reboot BSNL Modem
Click on Admin tab and then click on reboot.

From drop down menu select Last and click on Reboot. Now wait 1 minute to let the modem reboot. After this close the window and check your Internet connection.
Configure Internet Connection in BSNL Teracom Modem
To configure Internet connection in Teracom modem follow the steps below.
1. Login to BSNL Teracom Wireless Modem
Type 192.168.1.1 on the address bar of your browser to login Teracom modem.
Default BSNL modem user name and password is :
User Name: admin
Password : admin
Click OK. Now you will be on BSNL modem configuration page.
2. Click on Configuration Tab
Now click on Internet Connection to configure Internet in BSNL Teracom modem.
3. Remove old connections configured in BSNL mode
If you see any connections already made in the modem ,select the connection and remove them.
4. Add new connection in BSNL modem
Now click on the add button on the bottom of the page to create a new connection.
Now add following parameters in Internet Connection Configuration.
PVC Name: PVC0
VCI : 35
Service Category : UBR with PCR
Keep all other information the default and click Next.
5. Configure Connection Type
Now select PPP Over Ethernet (PPPoE) and LLC/ SNAP.
Now click Next.
6. Configure WAN IP Settings in BSNL Modem
Select Obtain IP Automatically. Make sure NAT and Default Route is checked.
Click on Next.
7. Set User Name and Password in BSNL Modem
Now type the user name and password provided by BSNL and click Next.
Now you will come to the summary page.
Click on Apply.
8. Reboot BSNL Modem
Click on Admin tab and then click on reboot.
From drop down menu select Last and click on Reboot. Now wait 1 minute to let the modem reboot. After this close the window and check your Internet connection.
Subscribe to:
Posts (Atom)